Walkthrough
Greywind Dungeon
Corak's Notes
Enormous serpents wander the vast, empty halls of Greywind Dungeon. The Sands of Oolam have long since run still, and the Victory Gong that once heralded returning armies has hung silent for decades. Greywind the Illusionist designed this dungeon as an observatory for time — four centuryglasses in its corners let him peer into Terra's history. What he saw on his final night there, he carried into eternal silence.
Enemies: Death Snakes, Great Hydras Greywind Dungeon is within Castle Greywind.
- 1Entrance/Exit.
- 2Sands of Oolam (centuryglasses in the four corners) — Greywind's former time-observation mechanism.
- 3Victory Gong — a silent relic of past triumphs.
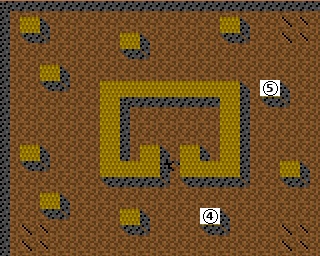
- 4Treasure cache — 1,000,000 gold + 5 L5 items.
- 5Treasure cache — 1,000,000 gold + 5 L5 items.
Greywind Dungeon is a vast dungeon beneath the castle, inhabited by Death Snakes and Great Hydras. Death Snakes (AC 25, 500 HP, Spd 90) are fast and poisonous — they typically strike first. Great Hydras (AC 60, 5,000 HP, 12 attacks) are the most dangerous creatures here; their twelve attacks per round can devastate even a veteran party. Cast Protection from Elements (Poison) before entering and ensure the party's AC is as high as possible.
The four centuryglasses (Sands of Oolam, location 2) once stood in the dungeon's corners. Greywind used them in combination to open windows into Terra's past and future. The knowledge he glimpsed on his final night he never shared with anyone.
The two main treasure caches (locations 4 and 5) each yield 1,000,000 gold and 5 L5 items — 2,000,000 gold and 10 high-level items in total. Warning: some gold lying freely on the dungeon floor is an illusion, a trap left by the Illusionist for the greedy. Only collect gold from the marked coordinates.