Walkthrough
Table of Contents — Suggested Order
Might and Magic III is intentionally non-linear — its own original author noted that a strict step-by-step walkthrough is “pretty much impossible”, since the only real constraint on order is the handful of keys needed to enter certain dungeons. The list below is one sensible path through the game, verified against the actual area-to-area connections described on each area's page, not just an alphabetical guess. Every step links to the full walkthrough for that location.
Steps marked Optional can be skipped without affecting story progress. Steps marked Requires: … need an item picked up earlier — the link jumps to that step.
The Western Coast
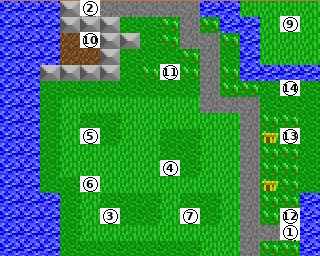
Fountain Head & region AThe party wakes up in their home town of Fountain Head. Time to gear up at a basic level and explore the nearby region A before heading further east.
-
1
Fountain Head Town
The home town. Stock up on equipment and rations before heading out.
-
2
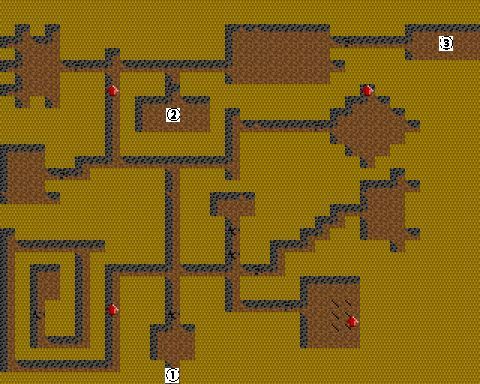
The cavern beneath town, guarded by the Rat Overlord — free Morphose.
-
3
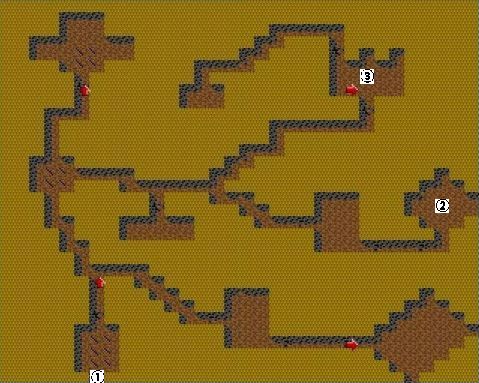
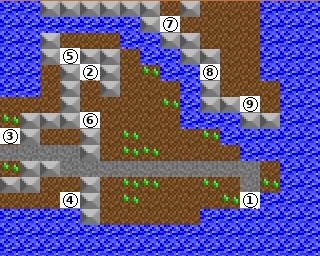
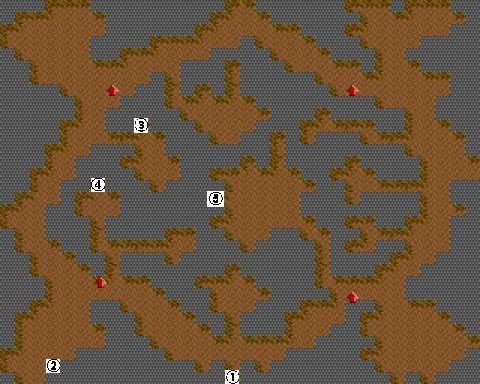
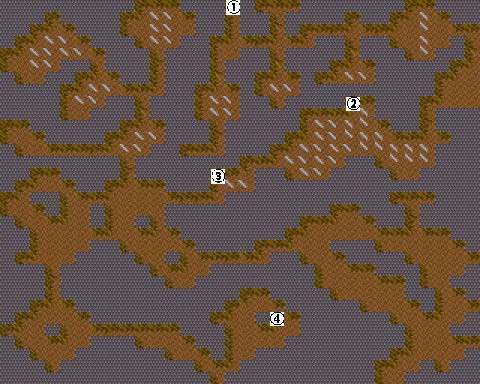
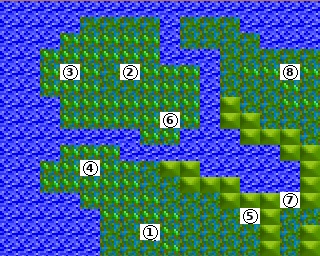
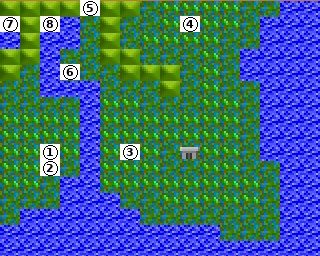
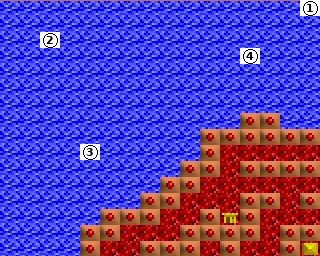
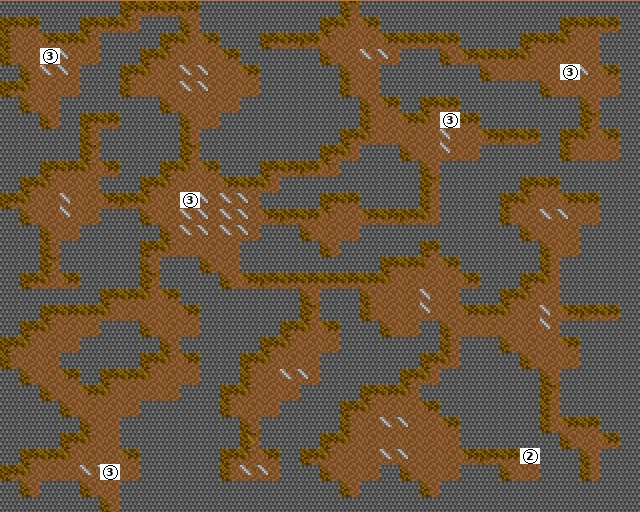
A1 — Hidden Valley Area
The first outdoor area. Orcs and Goblins — low threat.
-
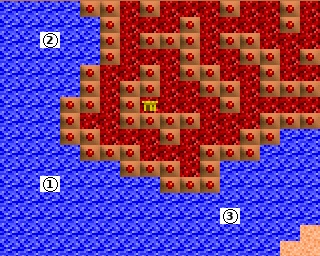
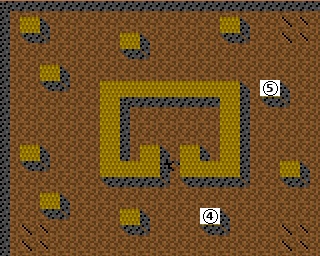
4
The first serious dungeon — earn the Crusader skill at the Fire Mane statue.
-
5
Orc lairs, the Pyramid of Storage, and the start of the Icarus quest.
Note: The Pyramid of Storage needs the Golden Pyramid Key Card — not obtained until step 11 (A4). You can come back later.
-
6
A town overrun by the undead after an unexplained disaster.
-
7
The cavern under Baywatch — watch out for floor pits.
-
8
Castle Whiteshield Castle
King Zealot's stronghold — side quests and shopping, no enemies.
-
9
The dungeon below the castle — the captured Dwarves' enchanted treasure.
-
10
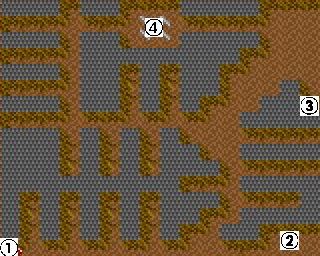
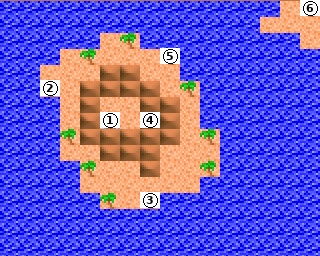
A3 — Evil Eye Forest Area
A dense forest — without the Path Finder skill you'll only explore part of it.
-
11
Mount Keystone and the Golden Pyramid Key Card — the key to every pyramid in the game.
Region B: Valleys and Strongholds
Region B + side dungeons/castlesRegion B is the richest hub of side content in the game: two castles, a town, three caverns, and the entrances to three optional, very hard dungeons (worth noting for later — see Act VI).
-
12
B4 — Locust Grove Area
A calm area, the hub for side trips to Wildabar, Blood Reign, and Arachnoid Cavern.
-
13
A town taken over by the Ninja Clan, Tumult's mercenaries.
-
14
The cavern under Wildabar — captive Ogres and a potion-brewing Wicked Witch.
-
15
Castle Blood Reign Castle
The throne of Tumult, King Chaotic — side quests and treasure trading.
-
16
Blood Reign Dungeon Dungeon
Free Son of Abu and Charity from prison; get the Black Terror Key.

-
17
Optional but convenient — the source of the Yellow Fortress Key and Blue Unholy Key.
-
18
The dangerous waters of Piranha Bay and an undead-infested graveyard.
Note: The entrance to Dark Warrior Keep is here (an optional, very hard dungeon — full coverage in step 39). You can also sail from here to Swamp Town for 2000 gold (Captain Squib) — an alternative to the route in step 30.
-
19
Home to the exiled Ogres that took over the valley from the Trolls.
Note: The entrance to the Fortress of Fear is here (an optional, very hard dungeon — full coverage in step 40).
-
20
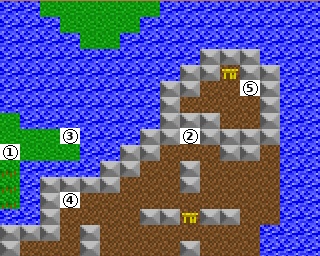
B1 — Leper Canyon Area
The approach to the Cyclops King's cavern, surrounded by a dense Wild Fungus forest.
Note: The entrance to Slithercult Stronghold is here (an optional dungeon — full coverage in step 37).
-
21
An optional cavern — the source of the Red Warrior Key and Green Eyeball Key.
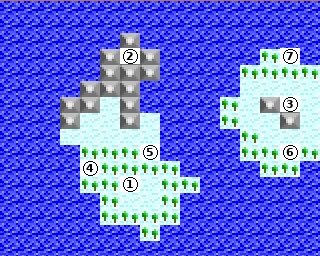
The Frozen Straits
Region C & DA short, calm land bridge connecting the western half of the map to the eastern half. Two simple areas, no side content.
-
22
A small, simple area. The Full Moon Shrine and harmless Werewolves.
-
23
Another simple area — no monster lairs to destroy.
The Eastern Lands and Swamps
Region E & FRegions E and F connect row-by-row (E1↔F1, E2↔F2, E3↔F3), so the path zigzags between them, with side trips to Castle Dragontooth and Swamp Town. One of the game's longer side quests also starts here.
-
24
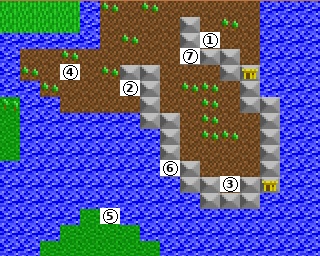
E1 — Serpent Woods Area
The gateway to Castle Dragontooth, which lies across this area.
-
25
Castle Dragontooth Castle
The throne of Malefactor, King Insane — side quests for crusaders.
-
26
Dragontooth Dungeon Dungeon
The dungeon beneath the castle, ruled by Wicked Witches and the spirits they summon.
-
27
Snowy, avalanche-prone terrain — Archers and Cursed Fools, trapped hidden treasure.
-
28
F2 — Shadowmire Area
The Tomb of Terror and Pyramid of Water; impaled skulls reveal what's needed to finish the game.
-
29
E2 — Deathbog Area
Princess Trueberry and her quest, tied to the Icarus quest from step 5.
Note: Only finishing Princess Trueberry's quest lets you complete the Icarus quest started in A2 (step 5).
-
30
Swamp Town Town
A town overrun by VonEmosh and his undead army.
-
31
Swamp Town Cavern Cavern
The cavern under town — Scorpias, Phantoms, and age-draining Reapers.
-
32
E3 — Evermoors Area
Inhospitable terrain with quicksand; treasure hidden in the water.
-
33
F3 — Minotaur Marsh Area
Statues of five gods that reward donations, and the entrance to the Maze From Hell.
Note: The entrance to the Maze From Hell is here (a very hard dungeon — full coverage in step 38).
-
34
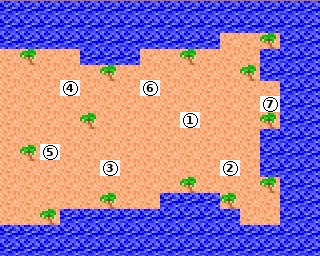
F4 — Forsaken Sands Area
The Pyramid of Earth and three wells of temporary experience/mana bonuses.
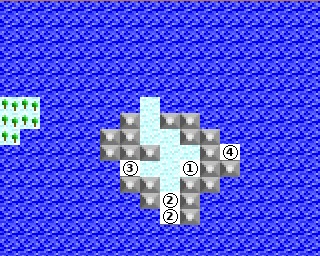
Gateway to the Isle of Fire
Blistering HeightsThe last town in the game, reached mainly via the Magic Mirror rather than on foot. The best gear before the endgame.
-
35
The last town in the game, on the Isle of Fire — the best non-random gear.
-
36
The cavern under town — altars granting permanent elemental resistance bonuses.
The Final Dungeons
EndgameFour independent, very hard dungeons. Each has its physical entrance elsewhere on the map (noted in the relevant steps above), but all are best tackled at the end — they demand a high level and items obtained long before.
-
37
An optional dungeon with Quatloo currency — a good source of permanent stat bonuses.
Entrance: in Leper Canyon (step 20)
-
38
The Ultimate Adventurer title and Hologram Sequencing Card 006 — some of the deadliest monsters in the game.
-
39
Hologram Sequencing Card 003 and two Ultimate Power Orbs guarded by the Top Jouster.
Requires: Red Warrior Key — from Cyclops Cavern (step 21). Entrance in Land of the Gargoyles (step 18).
-
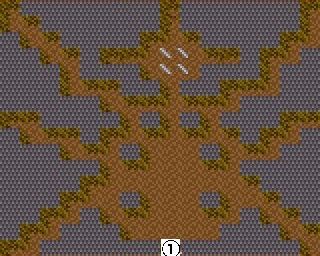
40
The stone-head puzzle leading to the Mummy King's tomb and Hologram Sequencing Card 001.
Requires: Yellow Fortress Key — from Arachnoid Cavern (step 17). Entrance in Valley of the Trolls (step 19).
Isle of Fire, Isles of Illusion & Buzzard Bluff
Areas C2–E4Seven areas previously without individual guides. The Isle of Fire is hostile territory with demon portals to destroy; the Isles of Illusion hold Castle Greywind and Castle Blackwind — both required to finish the game; Buzzard Bluff conceals Magic Cavern with the highest-level spells in Terra.
-
41
Major Devil portal to destroy. Entrance to the pyramid complex.
-
42
Great Hydra Lair — one of the highest rewards in the game.
-
43
Castle Greywind — free Greywind's spirit to receive the first half of the final code.
-
44
Free Greywind the Illusionist's spirit; Throne of Great Power (+10 all stats, day 50); Fountain of Anathema.
-
45
Greywind Dungeon Dungeon
Death Snakes and Great Hydras. Two caches of 1,000,000 gold + 5 L5 items each.
-
46
Fire Stalker and Fire Lizard lairs. Pirate Queen patrols the waters.
-
47
Blistering Heights and the Major Demon Lair. Shrine of Protection nearby.
-
48
Castle Blackwind — free Blackwind's spirit to receive the second half of the final code.
-
49
Free Blackwind the Spellbinder's spirit; learn all spells (2,000,000 gold); Throne of the Sea Jewel (day 60).
-
50
Blackwind Dungeon Dungeon
Cursed Fools. Three statues in the corners: Blood Mane (NW), Tempest Storm (SW), Hamon Othreute (SE). Maze-like magic bends the corridors.
-
51
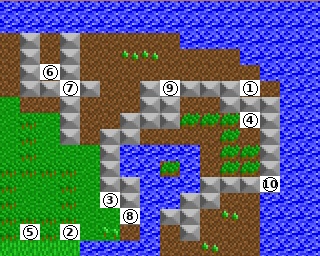
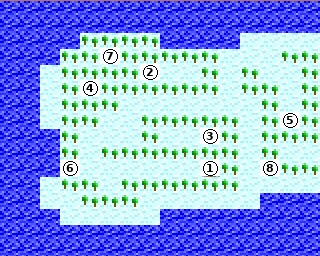
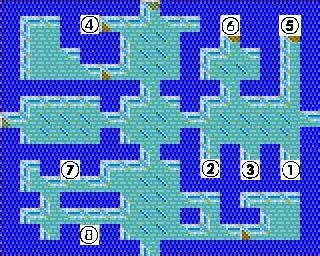
E4 — Buzzard Bluff Area
Magic Cavern with master-level spells. Six magical wells.
Missing Dungeons & Sheltem's Ship
A2, A3, B3, D1, E4, F1, F2, F4, C2Thirteen dungeons previously without a walkthrough. Halls of Insanity, Cathedral of Carnage, Dragon Cavern, Cursed Cold Cavern and Tomb of Terror close the Sleeper thread on Isles of Terra. Magic Cavern yields master-level spells. The engine-sector network ends at the Main Control Sector — entering code BLASTOFF completes the game.
-
52
Stone head puzzle leads to Insane King. Hologram Sequencing Card 002.
-
53
Four bosses in one dungeon: Barbarian King, Crap Knight, Psychotics King, Warlord.
-
54
Four Power Orbs. Dragon Lord and his hoard. Draconi and Green Dragons in every corridor.
-
55
Black Terror Key for Tomb of Terror. Level and Magic Resistance cauldrons. Boss: Black Knight.
-
56
Two Power Orbs, Hologram Card 005, four Mausoleum thrones (+20 levels). Boss: Vampire King VonEmosh.
Requires: Black Terror Key — from Cursed Cold Cavern (step 55).
-
57
Magic Cavern Dungeon
Gold Master Key for Maze from Hell. 14 spell altars. Five pools of +10 Intellect.
-
58
Forward Storage Sector Dungeon
Gemstone Altars: +20 to every attribute and +2 levels. Refresh once per year.
-
59
Aft Storage Sector Dungeon
Three Power Orbs. Eight crystal lion statues with Sleepers of Sheltem.
-
60
Alpha Engine Sector Dungeon
Four Power Orbs. Crystal receptacles with Sleepers from Arachnoid Cavern.
-
61
Beta Engine Sector Dungeon
Four Power Orbs. Crystal receptacles with Zealot/Malefactor Sleepers and sector passcodes.
-
62
Main Engine Sector Dungeon
Four Power Orbs in a single row (Y8). Crystal receptacles with answers to Terra's riddles.
-
63
Central Control Sector Dungeon
Terminators (3M XP each). Crystal chalices for +Energy Resistance. Interspatial Transport Box.
-
64
Primary Phaser Battery, Torpedo Launch Control, three stone Oracles. Code BLASTOFF — end game.